Just a few pics taken whilst out and about this week
Canary Wharf


Sculpture exhibition


Black Mountains, South Wales


Just a few pics taken whilst out and about this week
Used to improve on the ambient light to improve the composition of the picture. When ambient light is inadequate, or a higher shutter speed is required in low light conditions, the use of a flash will assist. the following photographs use a flash for ‘fill’, so as to enhance the all round lighting, or to remove the shadows in the darker areas:


The strength the flash can be adjusted through the setting on a scale, representative of EV compensation levels. Just as a point, though obviously not relevant here is that red-eye is avoided when using detached lighting.
These pictures taken through a church window are taken with an on-camera flash, but better would be a remote so as it can be manoeuvred for maximum lighting effect. This can be a single flash or a combination (master and slave).
Some other examples of the use of flash to assist the lighting of photographs:


the never ending struggle to improve on composition! here are a few taken overt the last couple of weeks…


As part of the coursework, we have been asked to shoot and present 5 themed photographs entitled “The Natural World and Man”. My selection is below:


These photographs have common denominators of grasses and sedges which left undisturbed take on an amazing variety of sizes and individual character. These settings show how man has intervened and shaped these for other benefits. These photographs have all been taken using small apertures, low (64 and 200 ISO sensor settings) and 5 or 10 Stopper filters so as to smooth out the water and maximise the colour vibrancy. Exposures timings were therefore between 40″ and 60″. Some post production image management has also been added to each. Composition has featured on dominant lines, lead-in lines and boundaries. The water in the powerful sunset image is a man made lake, and acts as the visual barrier between the land and sky.
an early Sunday morning trip to a gloriously sunny Kew and some interesting photo opportunities


and the search for the 5th photo of themed shots around sedges and grasses (The Natural World and Man) continues…


Photography. Now its getting personal. There’s no exact science or maths around what makes a good photograph, and everyone’s take on this is going to be slightly different. In general its a very subjective point, as one person may see merit in a picture not appreciated by others. But there are some general principles that can be followed, and these are:
Is the eye immediately drawn to a particular point or area? Is there a leading line? This may assist increasing the dwell time of the eye whilst the brain works it out and therefore of interest of the viewer
How does it feel looking at the photo? Oddly, the rule of thirds which offsets strong features is better than having something dead central, but there must be balance to remove any tension that may exist
Does the photo look as though it is cohesive, or is it all a bit disjointed? A bitty photo won’t provide any lasting pleasure. It will be distracting to the overall feel of the photo.
Are the dark areas sufficiently offset by the lighter areas? Are the shadows strong enough to make the features at stand out? A photo without sufficient contrast can make the overall photo seem a bit lacklustre
Always a good point of interest, and can be achieved by a slow shutter speed so as to give some blurring depicting action
Is there a pattern or repetition in the photo that is clear and pleasing to the viewer. Usually best placed in the foreground, this may be like a weave or a multiple objects mirrored to provide interest.
As part of the subject selection, photographs which did not meet highest standards of quality were rejected. All photographs must be in focus with appropriate light and colour levels. Noise, sharpness, chromatic aberrations and so on were all a prerequisite to the selection of these photographs.
For the “Natural World and Man” theme and following on from an upland lake scene with bog grasses in the foreground, my theme is to be –

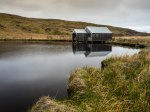


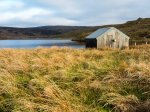
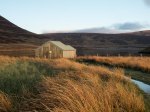
in this sequence of 4 photos, the reeds provide a focal point for the eye, but in my preferred shot, offer a natural frame for the out of focus hut in the distance


the meadow reeds provide an interesting foreground in their own right, but the overall picture is given interest by the alpine glasshouse in the distance. This has been positioned according so as to give balance to the picture, using the skyline and the tree


the meadow pasture in the vicinity of the Temperate House provides a beautiful foreground, and the pictures aim to transpose this serenity. putting the grasses foremost and in focus taking the backdrop out of focus (the man part) was my personal preference.


Going back to the days of negative film, the industry standard for recreational to semi pro cameras was a 35mm film (the length of the long side of the negative frame). then along came electronic trickery, replacing the negative film for a light sensitive ‘plate’ that matched the size of the 35mm film. The light sensitive plate turned the light it received into algorithms which could then be stored as a ‘digital file’. Another story. In the meantime though, the 35mm plate was classed as a ‘Full Frame’ due to its replication of the original negative size. As electronic advancements improved the ability of the sensor plate, it was apparent it no longer need be the full size it was, so a new generation came around of reduced sizes. These are shown by comparison in the image below
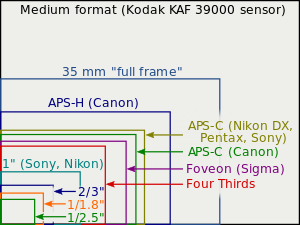
When an image is taken on a full frame sensor, the focal length is on a 1:1 ratio – a kind of baseline. When the image sensor is on a smaller image sensor, such as with an Olympus shown in red above, aka Four Thirds, this is half the size of the full frame. The outcome is that it is half the focal length of the lens. So again on my Olympus, the lens is 12mm to 40mm. This would be a wide angle to a portrait lens on a full frame, but gives the equivalent of 24mm to 80mm when used with a half size image sensor.
There are a variety of subject types or categories. These vary from portraits, (outdoor, indoor and studio), to landscapes, night time photography and then into niche areas such as long exposure photography, groups, and so on.
Composition follows a number of general themes. Every photograph though must have
1) balance, tension in a photograph does not lead to a satisfactory image
2) features such as a lead-in line taking the eye to a destination
3) symmetry and patterns, so as to produce a pleasing effect
4) repetition of elements, particularly in the foreground which is an area often forgotten, and this helps sets the base for the photograph
5) framing, or a frame within a frame. The view through an arch, pictures topped by a tree branch and so on all add to the perimeter detail that takes the eye comfortably to the centre of the picture. It becomes a focusing aid for the eye.
6) rule of thirds, the most commonly used criteria as this quickly helps develop the balance of a composition.
7) Off Centre, so as to leave space for the subject to move into. Eg a car moving in a direction is better positioned so that it has space to go forward.
____________________________________________________________________________________
The Coursework – this has been to follow the theme of:
My interpretation of this has been anything to do with nature, and where man has had an influence.
anything that moves falls into this group, be it sheep reared by man, a man in a tractor or the built environment playing an active part in the natural landscape:


the opposite to Active – simply a structure put there by man


Using Lightroom and Photoshop, the followingPhotographs have been adjusted;


As well as Post production alterations, filters can be directly used on camera lens to manipulate images for example N D filters which reduces light, graduated filters which varies the light across the width of the lens polarising and coloured filters
The most widely found problem with Photography is the use of the tripod. In public places, and with the tripod legs extended, they become an immediate trip hazard. In locations where there are numerous people and visibility becomes obscured, it is not uncommon for the next of the tripod to be hit. Great care must therefore be taken to ensure public Safety is respected.
In addition, photographic equipment is fragile and sensitive so using it safely is of paramount importance. Whilst every camera has its own characteristics, some being more robust than others, failure to keep camera is dry, in a dust free environment, careful handling to avoid scratches, with knocks and bangs Will result in immediate damage or foreshortening the longer term usage of the equipment. Simple rules of thumb on this such as regularly cleaning, the use of a camera bag with adequate padding, waterproof bags during inclement weather and general awareness of the fragility of the equipment is required.
Class this week studied the outcomes of what can be achieved with fast and a slow shutter speeds. Fast shutter speeds freeze motion to a crisp picture – an instantaneous snap shot as if instantly crystallised in time. With the opposite and where there is motion, a slow shutter speed will portray motion as a blur or a silky finish if the motion is continuous.
Great fun here blowing up water balloons exemplifying the benefits of a fast shutter speed. Set at 1/2000th sec is quite within the camera’s capability (max on Olympus is 1/8000), but aperture needs to be as open as possible to allow maximum light in and maintaining a low ISO to avoid noise.


Use of a fast shutter speed has more regular use with situations such as birds in flight, photographing a moving car etc.


Conversely a slow shutter speed can portray motion through movement as a blurring effect, with examples below:


polarising filters – glare off refelctive surfaces (water, & windows) is removed through the elimination of one of the axis of light. The results are much cleaner pictures showing considerably more detail in such situations than otherwise. it is also considered that colours become stronger with one plane of light rather than confused through the opposite
light reducing filters – known as neutral density filters which come in various grades. by reducing the quantium of light entering the lens, the shutter has to consequently stay open for longer. This allows photograph of water and skies to be taken that show the movement. Standard filters are the equivalent of 3, 6 & 10 f stops. With a 10 stop, an exposure time that might be set for 1/20th sec would give an equivalent exposure time of 51secs. Again, its also apparent colours become more vivid with the additional time the sensor has to collect the information
Use of both filters together:


Use of just the polarising filter:


This allows photographs to be taken of dark places from a position of greater light. The camera would be balancing this out, leaving the darker areas that the human eye can focus in on in the dark. HDR is an in camera application that takes 3 photographs of a subject in rapid succession. Depending on how the camera has been set up, though a typical spread would be of 3 frames, the first being under exposed at -3.0 f stops, then a desired exposure followed by an over exposed frame of +3.0 f stops. The averaged outcome captures detail of the dark areas that would otherwise be missed.


ICM has a use to show interest that would otherwise be a bland subject. Some of the outcomes give an abstract quality, which creates it’s own art form. Some shots are appealing as they make the viewer stop to consider the pattern that has been created or what the original might have been. I found it particularly useful to practise the hand motions before taking the first photo and don’t forget to stop the auto sensor/lens steadying option in the camera


… though much of my ICM is often Unintended CM !
This week was an introduction to long exposures. In class we learned to take multiple images on the same frame and light painting. This along with our own creativity for photographs using long exposures was the theme for the homework.
As always, a couple of things in some kind of order (!)…


the means employed to accentuate emphasis in a photo.
in the following photos, the grain of the wood or bark of the tree is used as the subject or the backdrop to give strength to the subject. Its worth noting how these are even more powerful if shot is taken or later converted to B&W:


Whilst timber shows texture well, there are an infinite number of other surfaces that express other senses. These include feel of smooth, soft, hard, riven, grainy, coarse and so on. the photograph should aim to bring these feelings out. Sharp focus to emphasise the detail is the key:


Why settle for one when you can have more! A pattern is simply a form repeated. it can be either regular or irregular, with the latter having more subtle and subliminal effect:


to give a pleasing pattern, sometimes circular and on other occasions its vertical, horizontal. The beach shot below shows is symmetrical horizontally, and uses different media to create the ‘symmetrical reflection’:


A pre-booked holiday to Nepal, so sorry to miss the classes. But on the other hand, it did give me a wonderful opportunity to photograph coursework in abundance.
A photograph with good composition is one that makes the viewer dwell a little longer than another photograph. Sometimes this is just subjective, but the viewer can be encouraged if the photograph has been taken following some additional rules:
The eye first looks at the photo, but us then drawn to a different part of the photo. Usually this is the far distance, but more interesting lines can be created if traversing the view


This is another common way to draw the eye in, with intrigue and interest deeper, and often more subtly within the picture. Doorways and arches are simple, but the more subtle have a way too:


an appealing way to emphasise and maintain attention. Somtimes this is regular, as often found in nature, but often irregular when it has just ‘happened”:


as is clear, just a really solid point of interest


Simplicity, whilst achieving balance of position and brightness giving the satisfaction of looking at a well composed photograph:


(Having something good to photograph also helps!)


getting the subject in the right place. This will in frequent circumstances follow the 1/3 – 2/3rds rule for positioning, but some subjects, such as really close in and detailed shots are better centralised, Here, a willing tulip demonstrates the options and what I think is the optimum positioning of the frame:


What photographs may be taken in open and Public spaces, this is not the case on private land. Consent should be sought the case of the latter prior to setting up or taking a photograph.
In addition, it is an appropriate to take photographs of minors without parental consent. general care and well-being of the subjects must be respected at all times
The Photos taken use a variety of filters including polarising and neutral density, tripods, shutter release cables, timers and light deflectors. The quality of the images demonstrates an understanding of the principles of these.
With the exercises on EV compensation completed, it is now understood how beneficial it is to adjust settings within the camera to get colour and contrast correct. Whilst using aperture or speed priority with EV compensation is one way to achieve this, an alternative method is to is to go fully manual, thereby taking full control of all the settings.


There is a system in the madness, and it is as follows:


It’s a personal choice, but my preferred picture is the third in the series with the shutter speed of 1/1600. Slower still doing homework than this the sky is weak and the colours of the buildings are muted. Slower than this just produce more dramatic skies but the buildings in the foreground become too dark


This series of photographs is all about the sky. So whilst the broken stone wall in the foreground is important, its clarity is of less consequence than getting the optimum sky. As mentioned before, dramatic sky can be made powerful by reducing the light by way of a faster shutter speed
Leading lines take the eyes of the viewer from one place to another. This may and in a defined destination, such as a Church, buildings or sunset, or on other occasions such as with the gondola below, to a place around the corner that can’t be seen. These leave intrigue and curiosity to help make a compelling photograph


Be it man made or nature repetition is all around. Here I have concentrated on buildings and the relative positions of objects. The weave of Harris Tweed also makes a very curious focus


In its simplest sense, a door or a gateway and more subtle situations such as the deer lying down framed by 2 others symmetrically standing on either side. The effect in common is that the framing objects clearly seen at first then direct the eye to another place. This is without being led as happens with leading lines.


